Patch testing skincare products is a critical step that many people overlook, but it can make all the difference in preventing adverse reactions to skincare products. In this blog post, we'll explore what patch testing is and how to do it, as well as some top dermatologists' quotes on the importance of patch testing.
What is Patch Testing?
Patch testing is a method for identifying whether a particular skincare product or ingredient may cause an adverse reaction on your skin. This simple test involves applying a small amount of the product or ingredient to a small patch of skin, usually on the inside of your wrist or behind your ear, and monitoring the area for any adverse reactions for 24 to 48 hours. This can include redness, itching, swelling, or other forms of irritation.
Why is Patch Testing Important?
Patch testing is essential because it can help you avoid potentially harmful reactions to skincare products. Even if a product is marketed as "safe" or "natural," you can still have an allergic reaction or sensitivity to certain ingredients. This is especially important for those with sensitive skin, eczema, or other skin conditions.
According to Dr. Joshua Zeichner, a New York City-based dermatologist, "Patch testing is the gold standard for determining whether someone is allergic to a product. It's an essential tool for anyone who has sensitive skin or has had an adverse reaction to a product in the past."
Dr. Annie Chiu, a Los Angeles-based dermatologist, agrees, stating that "Patch testing is the only way to identify the specific ingredient or ingredients causing an adverse reaction. Without patch testing, it's challenging to determine the cause of a reaction, and people may be left guessing."
Step-by-Step Guide to Patch Testing
Now that you understand the importance of patch testing let's dive into how to do it correctly. Here are the steps to follow when patch testing skincare products at home:
-
Cleanse the area: Start by cleansing the area where you'll be applying the product. Use a gentle cleanser and warm water to remove any makeup, dirt, or oils.
-
Apply the product: Apply a small amount of the product to the inside of your wrist or behind your ear. Avoid the eye and mouth area.
-
Wait: Leave the product on for 24 to 48 hours. It's essential not to wash the area or apply any other skincare products during this time.
-
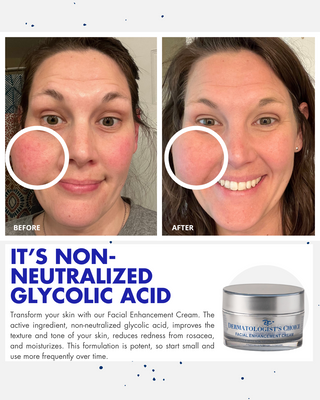
Observe: Check the area for any signs of redness, itching, swelling, or other forms of irritation. If you notice any adverse reactions, remove the product immediately and rinse the area with cool water. Note: if patch testing non-neutralized glycolic or TCA acid some redness is normal and not reason for alarm. Learn more about glycolic skin redness and irritation here.
-
Repeat: If the product passes the patch test, you can apply it to your face or body as directed. However, it's always a good idea to patch test each new product or ingredient you try.
Patch testing skincare products is a simple step that can save you from potential adverse reactions, making it an essential part of any skincare routine. As Dr. Bottiglione reminds us, "Your skin is unique, and what works for your friend may not work for you. By patch testing, you can avoid the hassle of a potential reaction."
So, next time you're considering trying a new skincare product, take the time to patch test it first. Your skin will thank you!
Start patch testing Dermatologist's Choice Skincare with the 3 step 60 Seconds to Glow Kit. Shop Here